
Here’s how to add personalization option on Shopify in five steps: install a custom fields app, no theme code required. Mini: Custom Fields Personalize has a free plan and lets you add a textbox, dropdown, or engraving note in under five minutes, on the free plan with one field and no watermark.
This guide walks through what a personalization option actually is, why merchants add one, the exact setup steps, and the mistakes that cause a personalization field to quietly fail after it’s live. For Shopify’s own background on product-level fields, see their product fields documentation.
In this post:
- What a personalization option actually means on a product page
- Why merchants add this
- How to add personalization option on Shopify: step-by-step
- Setting it at the variant level
- Common mistakes (and the one most merchants miss)
- Free vs. paid: what you actually get
- Is a personalization option right for your store?
- FAQ
Quick disclosure: we build Mini: Custom Fields Personalize, the app used for the screenshots and steps below. The setup steps are accurate to how the app works today, and the same underlying approach, adding an input field to the product page, applies whichever app or method you use.
What a Personalization Option Actually Means on a Product Page
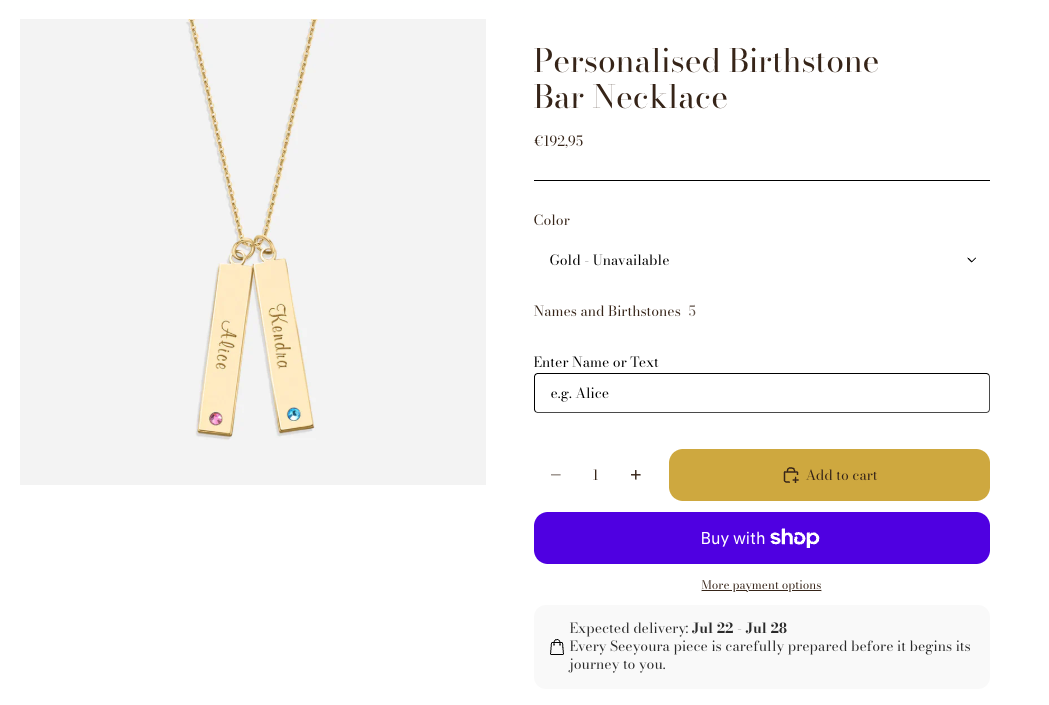
A personalization option is any input a customer fills in before adding a product to their cart: a text box for a name to engrave, a dropdown for a monogram style, a checkbox for “this is a gift,” or a short note field for delivery instructions. It’s different from a product variant. A variant changes what you’re selling (size, color). A personalization option changes what gets written on, engraved into, or attached to what you’re selling. If you’re deciding between the two, our guide to Shopify personalization covers the broader strategy.
Common examples: an engraving name field on jewelry, a gift message box on flowers or hampers, a monogram initials field on bags or towels, and a “special instructions” note field on made-to-order food or print items.
Why Merchants Add This
Without a personalization field on the product page, this information arrives by email, a note in a separate app, or not at all until a customer complains their order shipped without it. Merchants add a personalization option to capture the detail at the moment of purchase, attached directly to the order, so nothing depends on a follow-up email actually getting read.
That’s the practical case for how to add personalization option on Shopify: less manual back-and-forth, and order data you can actually act on.
It also opens a pricing lever. Once personalization is a real, visible option on the page, add-on pricing for it (an extra $5 for engraving, for example) becomes a normal, expected part of checkout rather than an awkward invoice add-on after the fact. That makes personalization one of the more reliable ways to increase average order value: customers who are already committed to buying a product are far more likely to pay a small premium for a version made just for them than to add an unrelated item to their cart.
How to Add Personalization Option on Shopify: Step-by-Step
- Install the app. Search the Shopify App Store for Mini: Custom Fields Personalize and click Add app.
- Create the field. From the dashboard, choose a field type, textbox for a name or note, dropdown for a preset list of options, and give it a clear label (“Name to engrave,” not “Notes”).
- Set a character limit and required/optional status. Decide whether the field must be filled in before checkout, and cap the length so replies stay usable for fulfillment.
- Assign it to the right product (or products). You don’t have to apply it store-wide, keep it scoped to the products that actually need personalization.
- Preview on both desktop and mobile, then publish. Confirm the field renders cleanly and the label is readable before it goes live.
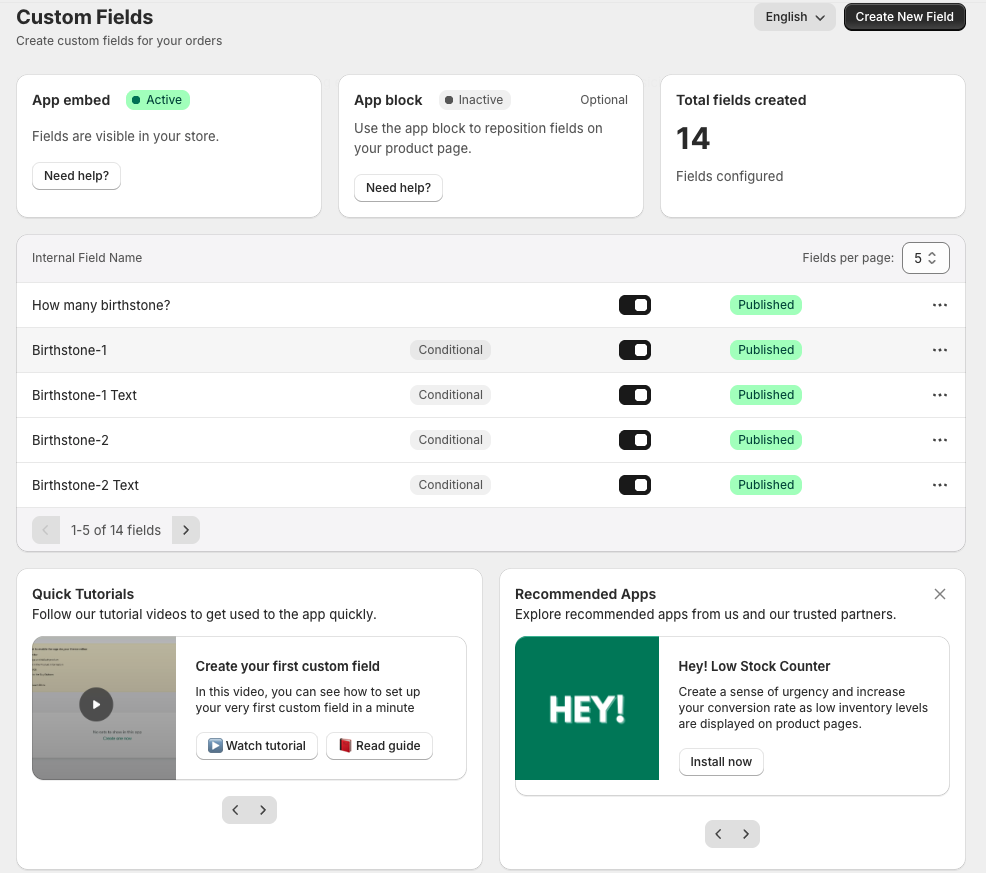
The screenshot above shows how quickly this adds up in practice, once you have the basics down, adding a second, third, or fourth field (including conditional ones that only appear based on an earlier answer) takes the same few minutes as the first.
Setting It at the Variant Level
If personalization only applies to some variants of a product, for example, engraving is only offered on the gold and silver finish, not the plain steel one, apply the field at the variant level instead of the whole product. This keeps the field from showing up (and confusing customers) on variants where it doesn’t apply, and keeps your fulfillment data clean since you won’t get stray personalization text on orders that never needed it.
Common Mistakes to Avoid
A handful of predictable issues show up right after a personalization field goes live:
- No character limit. An open-ended text box invites paragraphs where a name was expected, which makes fulfillment slower and messier.
- No required-field validation. If personalization is mandatory for a product (custom engraving with no blank option), the field needs to actually block checkout when it’s empty, not just suggest it.
- Forgetting to test on mobile. A field that looks fine on desktop can crowd or truncate on a phone, where most Shopify traffic actually is.
- Not checking the collection page. Some themes add a quick buy or “add to cart” button directly on the collection page grid. That button can bypass the product page entirely, which means it skips the personalization field too. The order comes through with no customization info attached, and the first anyone learns of it is a confused customer support ticket. Check your collection page template, not just the product page, before assuming the field is capturing everything it should.
Getting these details right is most of what separates a smooth how to add personalization option on Shopify setup from a messy one.
Free vs. Paid: What You Actually Get
The free plan on Mini: Custom Fields Personalize includes one custom field total, textbox, checkbox, radio button, or dropdown, with no watermark. That’s enough to test a single personalization use case, engraving on one product line, for example, before committing to anything.
The Basic plan ($5.99/month or $47.99/year) removes the one-field limit, adds the date picker field type, and adds conditional logic so a field can show or hide based on an earlier answer.
Premium ($9.99/month) adds file upload, image swatch, and add-on pricing tied to specific selections, useful once personalization becomes a paid upsell rather than just a data-capture field. Full setup details on how to add personalization option on Shopify across every field type are in our guide to adding custom fields to your Shopify store.
Is a Personalization Option Right for Your Store?
Before you commit to how to add personalization option on Shopify for a specific product, run through this checklist:
- Do customers currently email or message you personalization details after ordering? That’s the clearest signal you need a field, not a workaround.
- Is the personalization tied to specific variants only, or does it apply across the whole product?
- Does the field need to be required, or is it a nice-to-have that should stay optional?
- Will you charge extra for it? If yes, you’ll want add-on pricing support, not just a plain text field.
- Does your theme show a quick buy button on collection pages? If so, plan to check that flow specifically once the field is live.
One honest limit worth stating: the free plan’s one-field cap means if a product needs more than a single personalization input (say, both an engraving name and a font choice), you’re into the paid plan territory immediately. It’s a real constraint, not just a marketing “upgrade for more” nudge, and worth knowing before you start rather than after you’ve built out a product page around it.
“Mini Custom Fields Personalize has been a great fit for my store. It makes customization simple for customers and it was super fast to set up on my end. Easy customization that actually works.”
greetingsinbraille, United States. Mini: Custom Fields Personalize on the Shopify App Store
Frequently Asked Questions
- 1. What is a personalization option on a Shopify product page?
- It’s an input field, textbox, dropdown, checkbox, or similar, that a customer fills in before adding a product to their cart, capturing details like an engraving name or gift message directly on the order. Most guides on how to add personalization option on Shopify start with this exact distinction.
- 2. Do I need a developer to add a personalization field to my store?
- No. A custom fields app like Mini: Custom Fields Personalize adds the field through an app dashboard, with no theme code editing required.
- 3. Can I make the personalization field required before checkout?
- Yes, fields can be set as required so a customer can’t complete checkout without filling them in.
- 4. Does a personalization option work with product variants?
- Yes, fields can be applied at the variant level so personalization only appears on the specific variants that need it.
- 5. Is there a free way to add a personalization option on Shopify?
- Yes, the free plan on Mini: Custom Fields Personalize includes one custom field (textbox, dropdown, checkbox, or radio button) with no watermark.
- 6. Can I limit how many characters a customer can type?
- Yes, character limits can be set per field to keep responses short and usable for fulfillment.